Hello everyone,
In this blog, you will find a detailed explanation of creating a High
Availability with AWS CLI.
Prerequisites:
What is AWS CLI?
The AWS Command Line Interface (CLI) is a unified tool to manage your AWS services. With just one tool to download and configure, you can control multiple AWS services from the command line and automate them through scripts.
The AWS Command Line Interface (AWS CLI) is an open-source tool that enables you to interact with AWS services using commands in your command-line shell. With minimal configuration, the AWS CLI enables you to start running commands that implement functionality equivalent to that provided by the browser-based AWS Management Console from the command prompt in your terminal program
What is AWS S3 service?
Amazon Simple Storage Service is storage for the Internet. It is designed to make web-scale computing easier for developers. Amazon S3 has a simple web services interface that you can use to store and retrieve any amount of data, at any time, from anywhere on the web. It gives any developer access to the same highly scalable, reliable, fast, inexpensive data storage infrastructure that Amazon uses to run its own global network of web sites. The service aims to maximize the benefits of scale and to pass those benefits on to developers.
What is AWS Cloudfront Service?
Amazon CloudFront is a fast content delivery network (CDN) service that securely delivers data, videos, applications, and APIs to customers globally with low latency, high transfer speeds, all within a developer-friendly environment.
Now let's create a High Availability Architecture:
Launch an Instance using AWS CLI:
Open AWS CLI in window cmd and configure AWS CLI.
Now Launch an instance using the command:
aws ec2 run-instances --image-id ami_ --instance-type _type_id --count no_of_instance --subnet-id -a57e77cd --security-group-ids group_id --key-name key_name
After you run this command an instance will be launched and you will see something like this:
To configure Web Server, we need to install apache server i.e httpd and to install httpd use command
yum install httpd -y
After you install httpd now we need to check whether it is started or not and to check use the command:
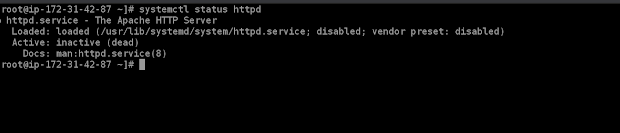
Here you can see it showing status inactive (dead), to start the service use the command:
systemctl start httpd
Now again check the status:
Now we can see it is showing running. Web Server is successfully configured.
To create an EBS Volume use the following command:
aws ec2 create-volume --availability-zone ap-south-1a --size 1
This command will create an EBS Volume of 1Gb. After running this command your EBS Volume will be created.
Now we have created an EBS Volume.
- Now we will attach EBS Volume to an Instance:
To attach EBS volume to an Instance use command:
aws ec2 attach-volume — volume-id <volumeid> — instance-id <instance id> — device <device (ex. /dev/sdf)>
After running this command you will something like this:
Now our EBS Volume is attached to an instance, we can confirm it from the WebUI
Here you can see EBS Volume of 1 Gb is attached to an instance.
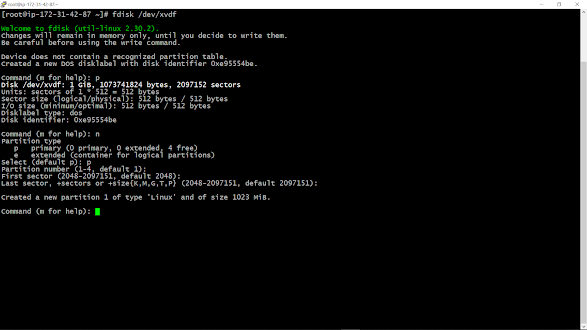
To create a partition use command :
fdisk /dev/xvdf
After running this command then press 'n' to create new partition and then press 'p' then enter.
And don't forget to save partion by pressing 'w'.
To formate the volume use command:
mkfs.ext4 device_name
- Mount /var/www/html directory:
To mount the directory use command:
mount /dev/xvdf /var/www/html
We can also check whether the directory is mounted or not using command 'df -h'
Now create a HTML file inside directory /var/www/html and create a page .
To create S3 bucket use the command :
aws s3api create-bucket — bucket <bucket name > — region <region name > — create-bucket-configuration LocationConstraint=<region name>
After running this command you will something like this:
Now we have created S3, you can also confirm it from WebUi
Now upload an image in Bucket that you will be used on the HTML page.
Here i have uploaded imaged named last2.png. Open the image and copy the path or location of image.
- Paste the image link in HTML file:
To paste the link go to that directory /var/www/html, select the file and edit.
- Create Cloudfront Distribution:
To create a Cloudfront Distribution use the command:
aws cloudfront create-distribution — origin-domain-name <bucket domain>
After running this command you will see something like this:
We can also check it from the WebUi whether a distribution is created or not:
Now or Cloudfront Distribution is made of S3 bucket.
Now open the HTML page using the IP address and file name in the browser
That's how we can create a High Availability Architecture, it will provide low latency to the page and page will open fast when access from anywhere in the world.
Thank you!!


Comments
Post a Comment
If you have any doubt please comment.