What is LVM?
LVM is a tool for logical volume management which includes allocating disks, striping, mirroring and resizing logical volumes.
With LVM, a hard drive or set of hard drives is allocated to one or more physical volumes. LVM physical volumes can be placed on other block devices which might span two or more disks.
What is Hadoop?
The Apache Hadoop software library is a framework that allows for the distributed processing of large data sets across clusters of computers using simple programming models. It is designed to scale up from single servers to thousands of machines, each offering local computation and storage. Rather than rely on hardware to deliver high-availability, the library itself is designed to detect and handle failures at the application layer, so delivering a highly-available service on top of a cluster of computers, each of which may be prone to failures.
Let's get started:
- First launch an instance in AWS and configure it as Master
launch an instance in AWS.
Now we need to configure it as Master, to do that first we need two software file installed in the terminal.
1. jdk-8u171-linux-x64.rpm
2. hadoop-1.2.1-1.x86_64.rpm
To install JDK file use the command rpm -ivh jdk-8u171-linux-x64.rpm
now to install hadoop file use command rpm -ivh hadoop-1.2.1-1.x86_64.rpm --force
Create a directory e.g mkdir /master
Now go inside directory /etc/hadoop
Configure hdfs-site.xml file , to configure it open it with editor vi hdfs-site.xml
Now between <configuration> </configuration> tags add 👇
Now configure core-site.xml file 👇
Now format the directory that we have created named /master using command hadoop namenode -format
Now start the service using command hadoop-daemon.sh start namenode
and use jps
to check it is started or not.
- Configure the Slave node(Datanode)
Like above install jdk and hadoop file in datanode terminal.
Create a directory e.g mkdir /slave2 in slave node we don't need to format directory.
After that go to the directory /etc/hadoop and configure hdfs-site.xml and core-site.xml file.
hdfs-site.xmf file configuration 👇
core-site.xml file configuration 👇
here that IP is of master node.
Now start the Datanode use the command hadoop-daemon.sh start datanode and use jps to check it is started or not.
Now go to Master node and use command hadoop dfsadmin -report to check datanode is connected or not.
here one more thing you can see is the storage provided by Datanode to Masternode that is 46.9 GB and we will be changing that using LVM.
Now let's start with our main topic 🤘
For this demonstration i have attached two storage to Vm named HDD1 and HDD2.
Now check how many storage are attached to the OS
To check that use command fdisk -l
Create Physical Volume(PV)
To create Physical Volume use command pvcreate storage1_name and same for storage2
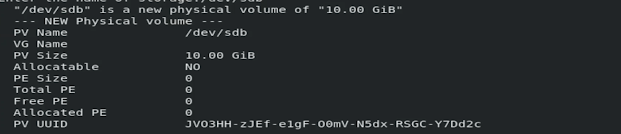
pvcreate /dev/sdb
To display the Physical Volume use command pvdisplay storage_name
To create Volume Group use command: vgcreate vg_name storage1_name storage2_name
vgcreate ARTHvg /dev/sdb /dev/sdc
To display Volume Group use command: Vgdisplay vg_name
vgdisplay ARTHvg
- Create Logical Volume(LV)
To create Logical Volume use command: lvcreate --size lv_size --name lv_name vg_name
lvcreate --size 5G --name myLV11 ARTHvg
To display Logical volume use command: lvdisplay
To format the LV use the command : mkfs.ext4 /dev/vg_name/lv_name
mkfs.ext4 /dev/ARTHvg/myLV11
Mount the Directory that you have created while configuring Datanode.
To mount the directory use command: mount /dev/vg_name/lv_name /directory name
mount /devARTHvg/myLV11 /slave2
Now go to the Master node
use command hadoop dfsadmin -report to check the storage provided by datanode.
Now you can see the storage provided to the masternode is 4.86 GB earlier it was 46.9 GB
That's how we can integrate LVM Partition with Hadoop and provide Elasticity to Datanode Storage.
⭐Automating LVM Partition using Python Script 👇
⭐Source code of Python Script👇
If you find it helpful then follow me on github and give star to the repo.😉
Thank you!!


Comments
Post a Comment
If you have any doubt please comment.